Showing posts with label DIY. Show all posts

August 12, 2014

Biking into the Future - DIY Electric Bike

Please welcome my friend Seth to the blog! He’s here to share how he added an electric assist to a couple of everyday bikes and how it’s helped him bike more often. - Alyson

I love to bike for the thrill of being outside with the wind on my face and feeling close to nature. Still, there are days when I wake up late and am pressed for time, or when it seems so easy to just hop in my car and drive that I forget why I like biking to work.

I wanted to avoid these kinds of mornings and make going by bike the easy decision. How could I get to work faster, but without the rush? How could I still get in some exercise, yet ride when I am dog-tired or unmotivated? Enter modern technology.
Prefabricated electric bikes can be bulky and expensive, but it’s possible to convert existing bikes at a fraction of the cost and with little extra weight (about 7lbs). This seemed like just the thing to get me and my girlfriend on our bikes on those days we might not otherwise ride.
After about an afternoon’s worth of work, our bikes were sporting inconspicuous, lightweight, motorized hubs powered by rechargeable battery packs. The hubs are controlled by a handlebar-mounted throttle with a tiny display panel indicating power usage. It’s easy to use - engage the throttle for a boost or ride the old-fashioned way when it’s disengaged with no additional drag.  
How much the throttle is engaged + the amount of pedaling = how fast the bike will go, as well as how much juice is drained from the battery. With the throttle fully engaged and without any pedaling, our electric bikes go about 15 miles an hour, for 8-10 miles. With pedaling, we can reach 20 miles an hour and a much longer distance.
Each charge of the battery costs only about $0.03 worth of electricity. I just need to remember to bring it in and charge it!
Our trips by bike have gone beyond simply getting to work. Now we’re running errands and heading out to see friends on our bikes. If you hear a slight whirring sound on the bike path and see a couple of smiling faces, it just might be us.

Contact
You can send me email at lakowske at gmail dot com for any questions about the electric conversion.  Feel free to stop by my website sethlakowske.com to learn more about what I am up to.

May 5, 2014

Easy Painted Bike Bell DIY

A compass bike bell I had gotten as a souvenir from Berlin broke off my bike last winter and I didn't rush to replace it, but now that the bike paths are brimming with people, a bell comes in handy. Yeah, I could yell out, "On your left!" but have found this less effective than the ding of a bell.
I made a couple of personalized bells as Christmas gifts and was happy with how they turned out (though I accidentally dropped one of them in the snow before the enamel dried). The process was a bit time-consuming. Then I got the idea to try using paint pens, which would be faster and easier for creating a design on a bell.
I picked up some paint pens from the craft store, along with a shiny new bell from my neighborhood bike shop, and got to work.
 Again with the triangles! I'm obsessed!
The fine-tipped paint pens worked great. The paint flowed evenly in a nice thin line.
I only wanted to apply the enamel to the dome of the bell, so I wrapped some paper around it and sprayed on the enamel per the instructions on the canister. Now the paint can't be scratched off (I tried).
I love the final bell from this quick and easy DIY!

April 13, 2014

DIY or Die?

It can be rewarding to do bike maintenance yourself, but if you’re not into it, that’s cool. You can enjoy using a bike for transportation without caring about how to change a tire.
Still, it’s empowering to have a base of knowledge of how your bike works. That way, if your bike starts making an odd sound or something feels off, you can do some troubleshooting and perhaps perform a quick fix.
For me and many of my friends who bike, the desire to tinker with your bike grows the more time you spend on it. No doubt this is partly motivated by saving time and money. For example, I don’t have to worry about being without my bike while it’s in the shop getting a flat fixed.
If you decide to try your hand at bicycle mechanics, set the right expectations and have a back-up plan. Don’t try to fix your first flat in the 30 minutes before you have to leave for work! Instead of having time to enjoy the learning process, anything that goes wrong will undoubtedly result in frustration. Plan to give it a try, but know that if your wheel doesn’t go back on quite right, you can then take your bike to the shop, where the mechanic will likely be happy to give you some pointers.
Investing in a bike stand will make working on your bike much easier. Before I had one, all my attempts to put my rear wheel back on my Dutch bike never worked out. It was just too difficult to align everything with the bike tipped upside down. With my bike stand, I can confidently remove my wheel to fix a flat.
While I’ll do some basic things myself, I still have plenty of work done at the shop - especially for my touring bike, which is more mechanically complex than my three-speed Dutch bike. I’m always working to acquire bike maintenance skills, but I’m a long way from doing a full tune-up.
For the time being, I’m content getting my hands dirty every now and again to fix a flat or make an adjustment here or there. 
Do you perform your own maintenance? 

January 29, 2014

Make a Bike Touring Journal


When out on a bike tour, it's nice to have a place for notes on your route, where you stop along the way, your pace, observations, and for a general record of your journey.
Peter and I have gotten into the habit of keeping detailed journals while bike touring. It's fun to refer back to when taking the same route later, as well as simply to reflect back on a fun trip. Still, I never had a specific journal for this, rather, I'd just grab some small notebook I had lying around.

This year I decided to make a touring-specific journal. I chose a light, thin Moleskine notebook that would be easy to personalize.
I used the photo scraps left over from an earlier project, letter stamps, a potato stamp, gel medium, and my trusty X-Acto knife to decorate the cover.
Now I just have to wait for spring to take my first tour of the year!

January 16, 2014

Display Bike Photos with a DIY Banner

If you have a smartphone, you probably have more photos than you know what to do with. I've accumulated a bunch of photos from bike trips or rides with friends that would be nice to display, instead of just taking up space on my hard drive. After seeing cute pennants around the Web, I got the idea for this project.
The supplies you'll need are cardboard pennants (you can make your own or buy them pre-made from a craft store), gel medium to use as glue, a brush for applying the gel medium, an X-Acto knife for cutting out your photos, and some string or twine for hanging the banner.

First, pick out the photos you want to use and print them out. Use a pennant to create a template to help you decide how you want to cut out the photos.
After using the template to frame your photo, cut it out with an X-Acto knife.
Put a coat of gel medium on your pennant and carefully mount the photo. Start by lining up the bottom point and then work up from there. Once it's dry, cut out the holes with an X-Acto knife.
Decide how you want the photos to be arranged and then string them up. I simply tied a couple of knots on the ends to hook around nails. Enjoy seeing and sharing your bike photos!

January 3, 2014

Personalize a Bike Bell

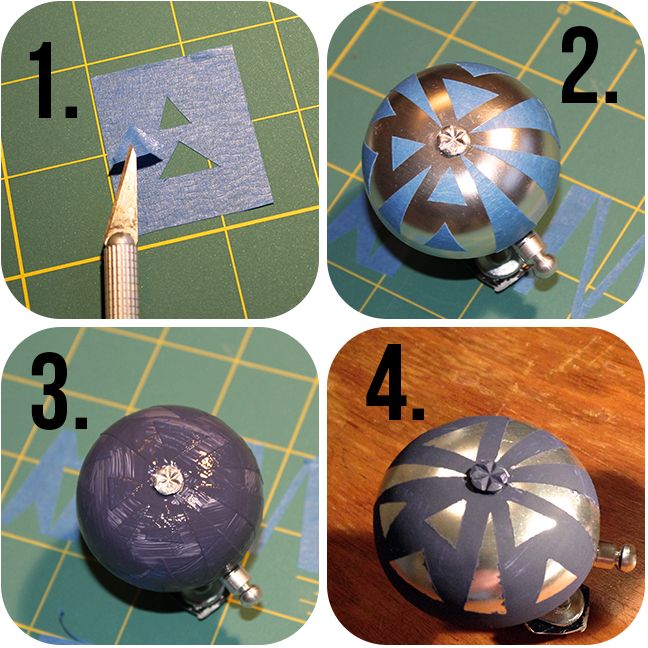
 Create a design you'll love on your bike bell! I'm obsessed with triangles, so it's no surprise the design I created consists of that shape.
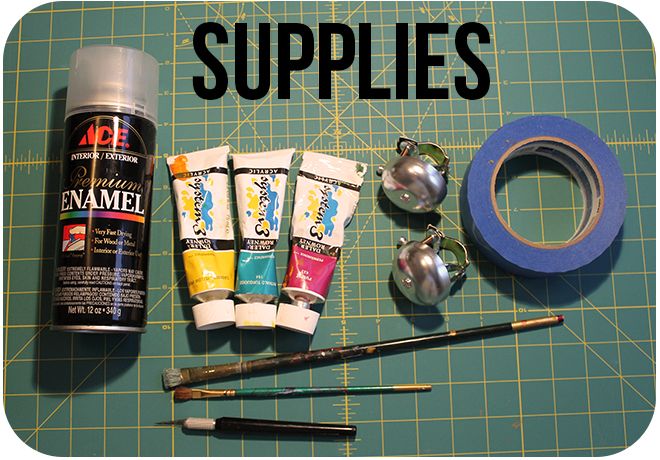
The supplies you'll need are a plain bike bell, acrylic paint, a paint brush or two, painter's tape, X-Acto knife, and clear enamel.
1. Cut shapes out of the painter's tape with an X-Acto knife.
2. Place the tape on the bell in the pattern you desire. Be sure it's securely adhered to avoid the paint seeping under the tape.
3. Cover the bell with paint and wait for it to completely dry. I used two coats.
4. Carefully peel off the tape. Then take the bell outside and spray it with enamel per the instructions on the canister. 
Enjoy your new bell!

December 25, 2013

Merry Christmas!

These are the different designs I came up with for this year's Christmas cards. I had fun making them for family and friends and am glad to share them here!

August 28, 2013

Personalize Your Bike with DIY Panniers!

I teamed up with a friend to bring you some DIY pannier inspiration. Abigail dreamed up these panniers to suit her everyday needs and personalized them to fit her bike's color scheme. In this video, she shows you the basics of bringing your pannier designs to life.

September 27, 2012

DIY Skirt Guards

Skirt guards, also known as dress or coat guards, are useful to have on a transportation bicycle. They protect your clothing from getting caught in the spokes and protect you from a resulting wreck. Velouria at Lovely Bicycle! sums up the merits of skirt guards well, and her post is a good read if you are unsure if skirt guards are for you.

January 10, 2012

DIY: Pinstriping Lugwork

Freshly Pinstriped Lugs

It is easy to add the classic aesthetic of pinstriping to your bike.

December 7, 2011

DIY Bags for Your Bike

Crafty? Make your own bike bags! Design them to be the perfect fit for your bike and reflection of your style.

Here are a few I've made out of old tote bags and other materials I had laying around:

 Wallet, keys and sunglasses fit perfectly.

 Attaches to rack with adjustable straps on the bottom of the bag.

 Great for holding the novel you can't stop reading.

Attaches with sturdy Velcro.